Last week Mother Nature gave us two beautiful snow storms that left our Utah neighborhood looking like a winter wonderland. The day of the first storm I had a list of errands to run, but as the snow accumulated I decided to stay home and off the icy roads. I used this time to create my own winter wonderland by painting a winter watercolor scene with splattered acrylic paint.
Our backyard.
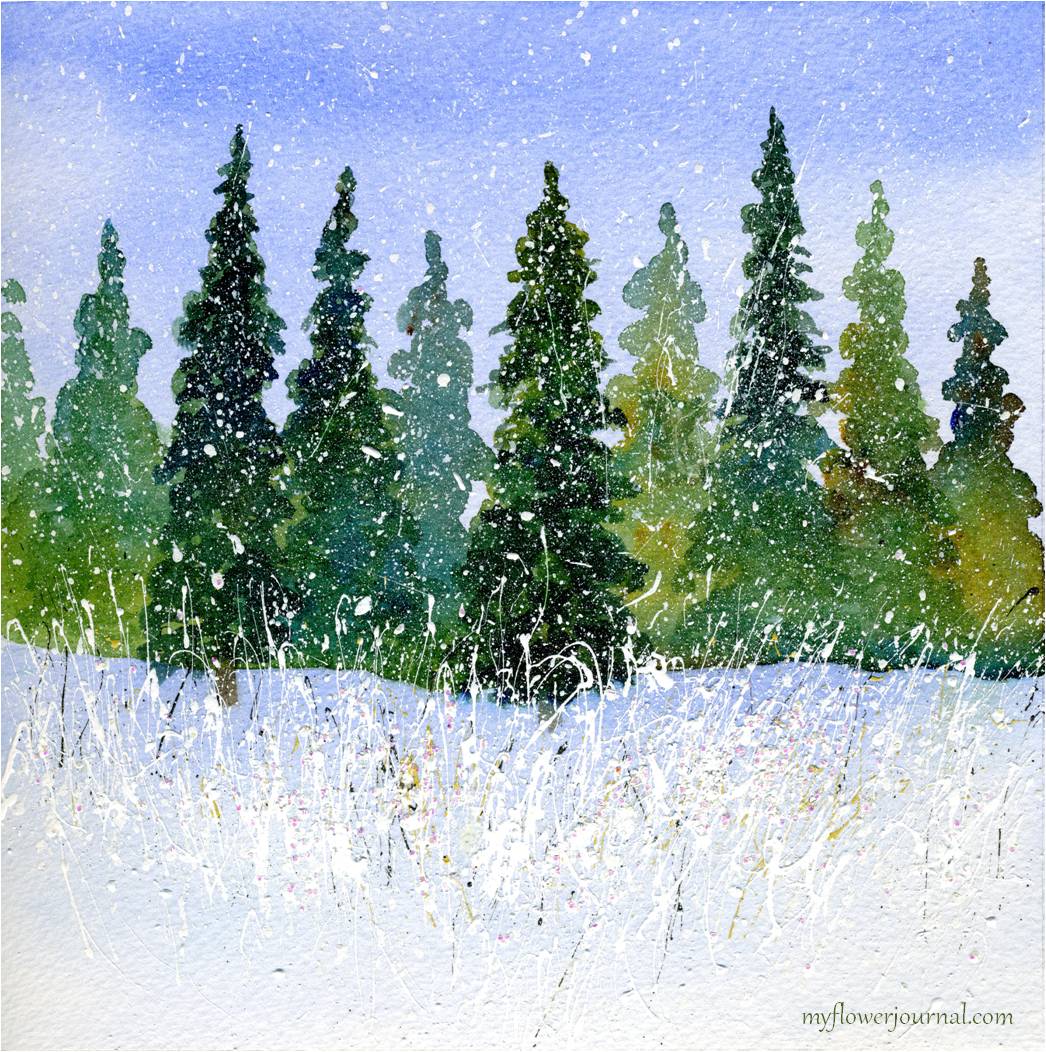
The winter watercolor scene I painted and splattered with acrylic paint.
Supplies:
Watercolors: After taking a watercolor class on Craftsy I now use the Daniel Smith Essentials Set (a limited palette) plus a few favorite colors for most of my watercolor projects, but there are times when its nice to premixed colors like the ones found in the Koi Watercolor set.
Watercolor paper, fluid acrylic paints, glitter, masking tape, ruler, paper towel, round bristle brush (I’ve tried a lot of different brushes and this one works the best.),disposable plastic table cloth or something to protect your work area from paint splatters.
Tape a piece of watercolor paper to a board. Mine is 8×8 inches. Do a blue watercolor wash with the color darker at the top and getting lighter towards the bottom. Watercolor dries light so do it darker than you think. When its dry lightly draw a horizon line and vertical lines where you want trees.
Paint tree shapes using watery mixes of greens, blues, burnt sienna and yellow ochre. Let the colors run together and mix on the paper. Make sure they are different heights and shapes. You don’t want them to look to perfect.
After the trees are dry darken a few of them so they look like they are in front of the other ones. Darken the snow shadow just below the horizon line and let it fade out to white. While it dries get ready to splatter. You can find tips for splattering paint here and easy clean up here. A video of how I splatter my paint is here with some FAQ.
Cover the trees with a piece of paper towel. Using a size 8 round acrylic brush and acrylic craft paint splatter a little yellow ochre and dark brown paint on the snow area to look like weeds or dry grass. Clean your brush well then splatter white paint. Take off the paper towel and splatter more so it looks like the snow covered grass is in front of the trees. Using lots of paint on your round brush with give you long grass like splatters and a few that look like snowflakes.
I added more splatters to look like falling snow using an old toothbrush. Rub the toothbrush in a little white paint. Work it into the tooth brush. With the bristles facing down rub the brush across your index finger. Try a few splatters on a piece of scrap paper. When you are happy with your splatters do it on your painting. If you have too much paint on your toothbrush you will get big gobs of paint instead of little snow flakes. Before the paint drys you can add a few sprinkles of a clear glitter to give your snow a bit of sparkle.
Video and FAQ can be found here.
As an Amazon Associate I earn from qualifying purchases. Many posts on my site contain Amazon affiliate links. I only share products I use and like. I make a small commission if you make a purchase through these links. I helps keep My Flower Journal running at no extra cost to you!
I will be sharing Winter Watercolor With Splattered Acrylic Paint on Tweak It Tuesday, Inspire Me Tuesday, The Scoop, Wow Us Wednesday, Be Inspired Friday, Show and Tell Friday, Inspiration Gallery, Feathered Nest Friday, Paint Party Friday, Art Journal Every Day
What a lovely snow scene, you’ve painted, Something for me to try when the Christmas wreaths and garlands are made, and the cards are sent.
It is so delicate, lovely!
Your artwork is gorgeous–I could spatter paint from here to Tuesday and it would never look as good as yours does! It’s beautiful.
just fabulous – such a beautiful painting –
thanks for the steps and explonation!
Happy PPF!
Wow! Love the splatter effect and it’s really cool to see the layers that go into your art! Happy PPF!
Beautiful Snow scene! Thank you so much for sharing your process!
Fantastic winter painting! Valerie
Great tutorial, love the painting! So atmospheric!
WOW,What a amaizing winter paintings,Love the white splatters,beautiful.
Happy PPF,Jeannette
This is really nice!:)
Brrrrrrr-r-r-r You have done a beautiful painting here. I love your splatters and the depth you have achieved. Happy PPF
Tammy, how inspiring! I am going to try this today. I know I can’t achieve the sharpness and beauty that you have but it looks like it would be such fun to try.
Oh I love this – it’s beautiful!
Thanks so much for stopping by earlier :)
Cheers, Jana
Just lovely Tammy! Thanks for showing your steps.
you make it looks so easy!
very pretty!! we had snow here too. i think i’m ready for spring already :)
happy paint party friday!!
have a nice Friday
much love..
my backyard looked like your on Monday-and now we’re supposed to get more tomorrow and Tues-NOOOOO! However, I LOVE your latest watercolor paintings of the winter scene!!
I really like this! At first I guessed the snow was accomplished with masking fluid… but how smart: acrylic! Great idea and effect.
This is a gorgeous page.
Beautiful scene with that dancing snow – love it!
Cheers
Gabriele
Beautiful!!!! It Look like the winter wonderland I woke up to today :)
You are so generous with your tutorial…what a gorgeous scene….thank you so much, I hope much is returned to you in a big way!!
Hugs Giggles
What a great painting!
How gorgeous!! Super tutorial too. Those trees are looking amazing with the bright snow. Very wintery!
Nice!! What a great technique.
Absolutely beautiful! Love your amazing artwork and how prettily you depicted a winter wonderland through your painting! Thanks for sharing with us! Happy Holidays! Hugs, Poppy
You’re a great teacher–love the painting. Would love to try it some day. Thanks for sharing, Diana
I love this painting!!! what a gorgeous piece…and the white adds so much texture like snow falling!!!!
I really miss your posts. Your works beautiful and inspirational.
I am SO inspired! Thank you for sharing this lovely painting and the progression of creativity which brought it to life.
Thanks Beth!